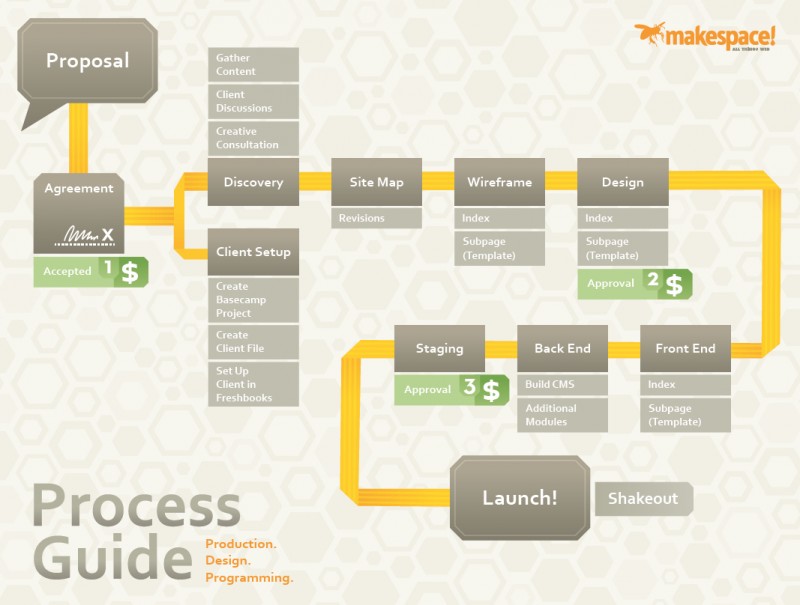
The process of website design and development is fraught with potential hazards. Miscommunication, failure to mitigate expectations, disorganization and their prolific and ugly kin can appear at any time on the road to building a successful web design experience. Time and budget are at risk throughout. We've all heard the old adage "Failing to plan = planning to fail", and that couldn't be more true in the web design and development process. Fear not, Dear Reader, we have the blueprint for the solution: The makespace! Website Design Process Guide.

Phase 1: Discovery
Our Process Guide begins at the point in which our client has selected for their web design project (Might I add that is one smart client!), although there are a number of steps, including a degree of planning and scoping necessary to conduct in order to submit an accurate web design proposal, but that is a blog post for another day. Once the agreement is signed and our retainer paid, we commence to get crackin'. This begins with the Discovery phase, which is similar to a 2nd date, minus the awkwardness and overabundance of cologne. In the Discovery phase we, well, discover. We uncover potential opportunities, discuss look and feel, pontificate on demographics, research the market, perform a competitive analysis, gather content and brand assets, and then begin my favorite part of the entire process: conduct a creative consultation in which we break out the oversized dry-erase board and sketch out ideas.
Phase 2: Site Map
Armed with the knowledge we gleaned from the Discovery phase, we snuggle up with a mind-mapping program and create was is essentially the skeletal structure of the website. Sitemapping, though tedious and potentially mind-numbing, is extremely important as it insures that we consider every page that will be included in the finished website - and just as important - once it is approved by our client it gives us a record for future reference to ward off every designer / developers supreme nemesis : the crafty and ninja-like Scope Creep. Furthermore, the site map is the direct blueprint of one of the most important elements of the website user-experience: Navigation.
Phase 3: Wireframing
Now we're cooking with gas. At this juncture we understand what our client wants, what their targeted demographic wants, where the opportunities lie, and the hierarchy of importance. Through wireframing we are able to tie them all together into an organized layout and really start to lay the build on the information architecture foundation we've established. Depending on the size and scope of the project, wireframes can range from simple line drawings to hi-fidelity renderings that resemble actual blueprints. Once the wireframe is approved we have all the ingredients to bake a delicious website experience.
Phase 4: Design
Having performed due diligence with phases 1 thru 3, our web design formula becomes simplified and can be defined with the following basic formula:
Client's Branding + Demographic Considerations + Sitemap + Wireframe = A fleshed out design that hits the proverbial nail on the head.
As this formula illustrates, having conducted a series of phases and client approvals pays off in the form of a clear and concise design path. This in turn creates an efficient design path in which we are generally able to get within 90% accuracy of both the client's wants and needs (which of course may not be parallel!).
At this point the web design files are ready to be be sent off to the website Production department for the ol' slice 'n dice, which I'll discuss in the next post, creatively titled "How We Roll: The makespace! Website Design Process Guide, Pt. 2 of 2".


